X-ray inspection technology has come a long way over the past several decades. Since its inception in the 1970s, x-ray computed tomography, or CT scanning, has completely revolutionized medical diagnostic practices. In the 1980s, we saw the introduction of micro-focus x-ray technology, which had large implications for non-destructive testing in the industrial and scientific communities. It wasn’t however, until the new millennium that improvements in x-ray detection technology and computing power enabled commercially-viable micro-focus x-ray CT scanning.

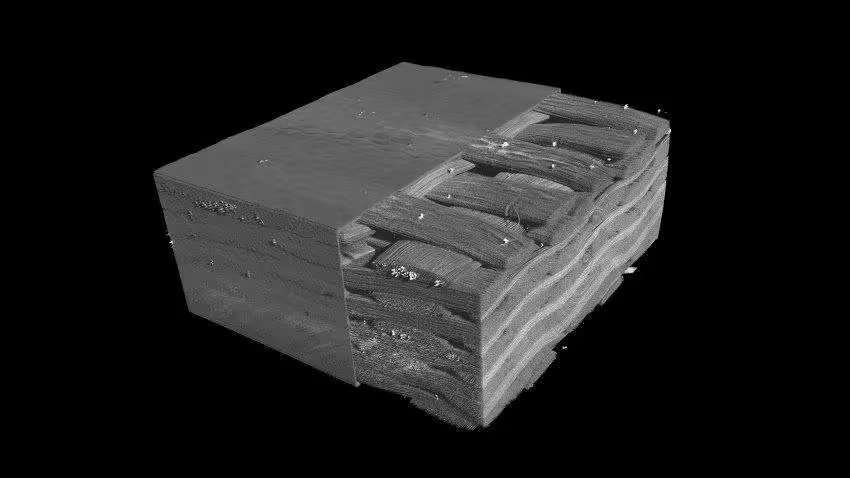
With micro-focus CT scanning, data can be captured at incredibly high resolution, sometimes even at the sub-micron level. This makes CT scanning an extremely valuable tool in materials research, especially when analyzing composite materials and their internal structures. The raw scan data, which is usually several gigabytes (20 GB+), can be rendered in 3D and even numerically analyzed. The image below shows a 3D rendering of a small section of a carbon-epoxy structure captured at approximately a 4 micron resolution.In this particular sample, a small composite block, the x-ray and imaging settings were optimized to enhance the contrast between the carbon fibers and epoxy resin. This enabled us to virtually segment and remove the resin material in order to expose the fiber structure. This data can be extremely valuable in evaluating structural properties of materials and different manufacturing processes. There are even software tools commercially available today that can numerically evaluate fiber consistency and orientation over an entire structure.

X-ray CT scanning is a very versatile process that can be performed on many different materials and even at different stages of a manufacturing process. The images above, show a high-resolution CT scan of a prepreg composite that has not yet been fully cured. In the image on the left (a single cross section), the brighter areas are the uncured resin material, and small openings and voids can be seen inside. These can also be numerically analyzed to provide far more data, including fiber volume fraction, both locally, and over a larger area.

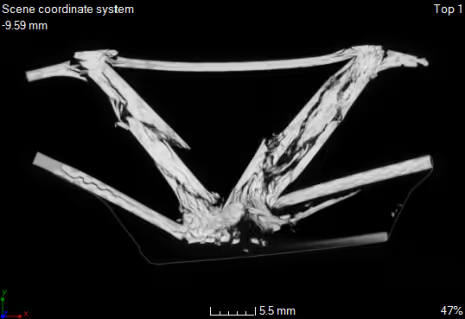
Even on the more “macro” scale, micro-CT can be a very powerful tool in structural and failure analysis. Small defects such as porosity and thin delaminations can be visualized with high resolution images. Failure modes can be spotted and easily identified in even the most complex of structures. The image above shows a cross section image from a high-load bearing structure that failed during mechanical load testing. The origins and full extent of the failure can be studied without the use of any destructive techniques that may compromise the sample and data.There are many applications of x-ray CT scanning in composite materials, and the list is rapidly growing. This type of testing has proven to be very beneficial in identifying damage and failure modes that previously had gone undetected, and has also provided the benefit of avoiding, often time-consuming, destructive analysis.NTS Chesapeake operates one of the most powerful, high-resolution CT systems in use today. A large walk-in 450kV micro-focus system enables large objects (up to 37 inches in diameter) to be imaged with extremely high resolution. This system, combined with NTS’s other x-ray capabilities and state-of-the-art processing and visualization tools, allows this technology to solve numerous problems spanning many different industries.